Guide

How to Make a Comic: 7 Steps from Idea to Finished Page

This is how to make a comic from a blank page, whether you draw with a pencil, on a tablet or not at all. We carry one tiny comic, about a boy and a kite that will not fly, through every step, so you can see the real sentence, script, sketch and finished panels instead of rules alone.

Updated 13 min read

Steps 1 and 2

Start with one sentence, not a whole world

Most people stall before panel one because the idea is too big or too vague. A short comic needs only three things: someone, something they want, and something in the way. Fill in the blanks below. If the sentence makes you curious about what happens next, you have a comic.

wants to
but

Your story

“Ollie wants to fly his new kite, but there is no wind at all.”

Turn this sentence into a free script

Opens the comic wizard with your sentence filled in. Scripts are free; you sign up to save.

Stuck? Try one of these

One sentence becomes three panels

  1. 01

    Setup

    Show the character and what they want. The reader should get it at a glance.

  2. 02

    Try

    They go for it and the obstacle pushes back. This is where the trouble shows.

  3. 03

    Twist

    Something changes: a surprise, a joke or a small win. Plan this panel first.

Before you draw

How to make comics: three paths, same steps

Ask ten artists how to create a comic and you will hear about ten different toolkits, but the writing steps are the same for everyone. What changes is how the pictures get made. None of these paths is the right one; pick the one that fits your time, your tools and what you enjoy.

A

Draw by hand

Paper, pencil, a pen for ink.

You need
Paper, a pencil, an eraser, a black pen or marker, and a ruler for panel borders.
How it feels
The slowest path, and the most personal. One beginner guide puts a finished page at about every few days.
Cost
Whatever is already in your drawer.
Pick it if
You like drawing, you are making a comic with kids or a class, or you want no screens at all.
B

Draw digitally

A tablet and a drawing app.

You need
A tablet or drawing pad with a stylus and a drawing app with layers.
How it feels
Undo, layers and copy and paste save redraws, but there is an app to learn first.
Cost
The device and the app, so more up front.
Pick it if
You already draw, you want clean files for the web or print, or you plan a longer series.
C

Do not draw

You write, AI draws the panels.

You need
A browser. An AI comic book maker like ours writes the script from your sentence and draws each panel in one of 25 art styles.
How it feels
Your time goes into the story and the edits. Bubbles stay editable text, so typos are easy to fix.
Cost
Scripts are free (10 a day on the free plan). You get 100 credits when you sign up; a panel costs 2 to 6 credits, and failed panels are refunded.
Pick it if
You have a story but not the drawing time or skill, or you want to test an idea before drawing it.

Or mix them.

Plenty of people draw by hand and letter on a computer. In our editor you can upload your own drawings into panels or start from a blank layout, then add typed bubbles on top.

The whole process, one comic

How to make a comic, step by step, with one real example

Most guides show each step with a different picture. Here is one 3 panel comic, Ollie and the Kite, carried from the first note to the finished strip. Copy the process with your own sentence.

  1. 1

    Pick a small idea

    Write down five small moments: something that went wrong today, a pet doing something odd, a what if. Pick the one you can already picture. Small beats big here: a first comic about a whole universe rarely gets finished, a first comic about one afternoon does.

    Good test: can you tell it in three panels? If not, it is a bigger project. Save it for later.

    ideas.txt
    • 1.Ollie and the kite that will not fly
    • 2.My cat versus the vacuum
    • 3.A robot who wants to sing
    • 4.Grandma's pie contest
    • 5.The longest bus ride ever
  2. 2

    Write it as one sentence

    Use the pattern from above: a character wants a goal, but an obstacle gets in the way. That sentence is your setup and your trouble. Then decide the twist, the last panel, before you write anything else. A comic with a clear ending is much easier to plan backwards.

    one-sentence.txt

    CharacterOlliewants toGoalfly his new kitebutObstaclethere is no wind at all.

  3. 3

    Write the comic script

    A comic script is not just dialogue. For each panel, write what the reader sees (place, who is in it, what they do, how close the camera is) and then the exact words. Keep each panel to one moment. The full script for Ollie, with word counts, is in the next section.

    script.txt

    PANEL 1. Wide shot. A grassy hilltop on a sunny day. Not a leaf moves. OLLIE holds up his new yellow kite, grinning.

    Ollie: Perfect day for my new kite!

    PANEL 2. Ollie runs down the hill, dragging the kite through the grass behind him.

  4. 4

    Sketch thumbnails

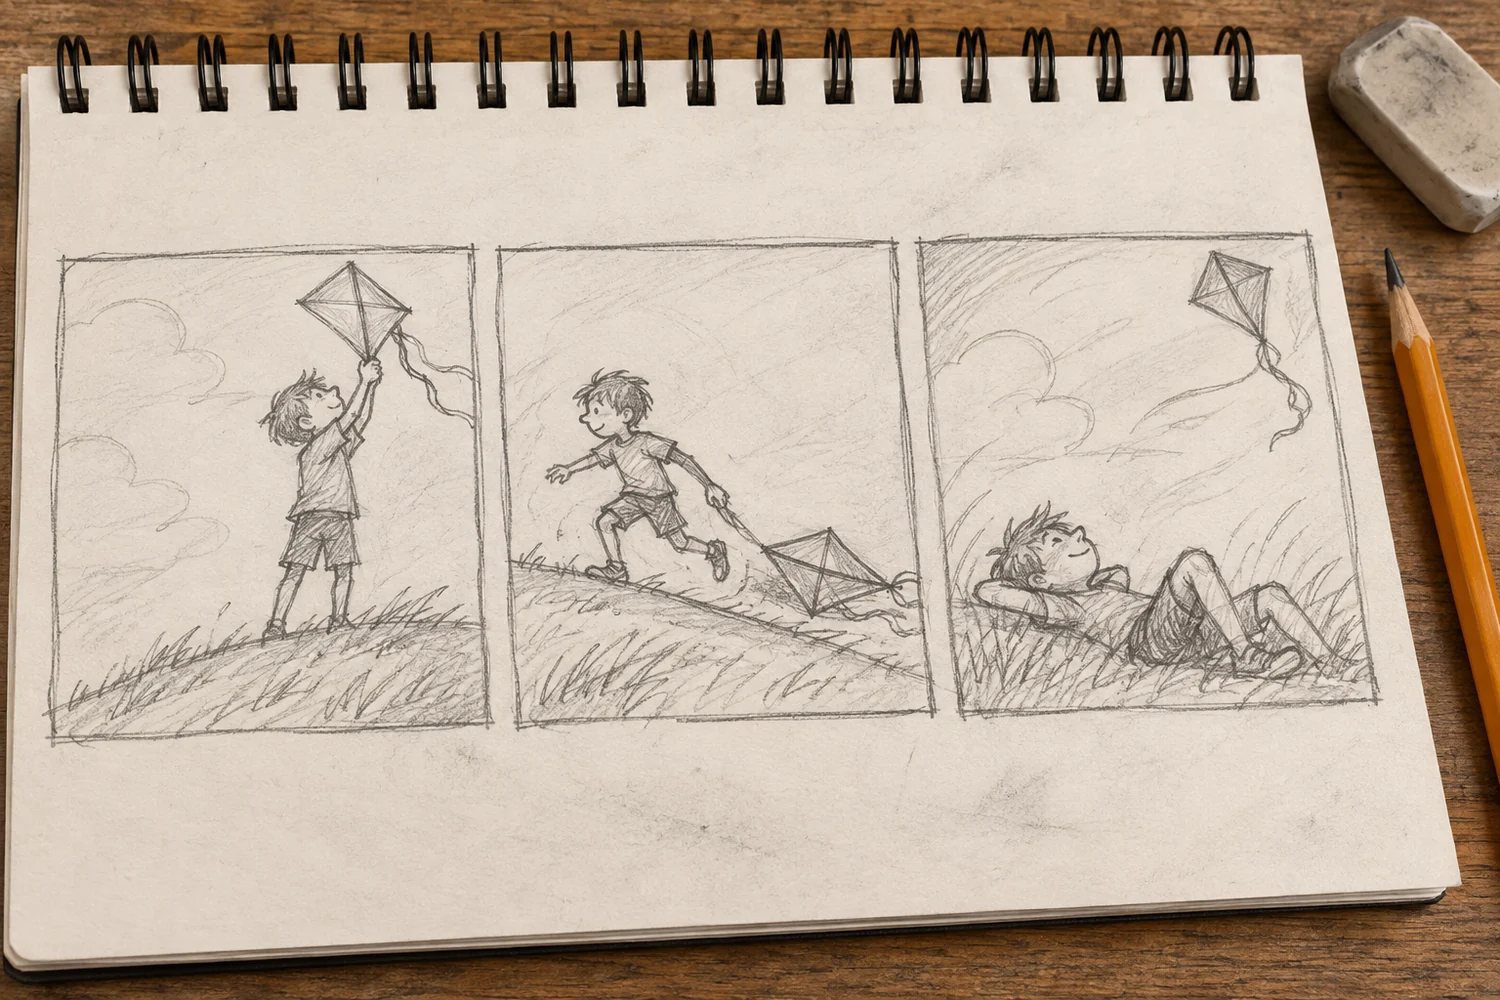
    Thumbnails are tiny, ugly sketches of every panel, a few minutes each. They are where you decide the camera (close or far), where the character stands, and where the words will go. Leave empty sky or wall where each bubble will sit. Redrawing a thumbnail takes seconds; redrawing a finished panel takes an evening.

    Drawing thumbnails on a printed storyboard sheet keeps the boxes the same shape as your final panels.

    thumbnails.jpg
    Rough pencil thumbnail sketches of the three Ollie panels side by side on sketchbook paper: a boy holding a kite on a hill, the boy running and dragging the kite, the boy lying in the grass as the kite rises.
    Loose, fast and messy is the point. Notice the empty sky left in each box for the words.
  5. 5

    Draw the panels

    Now draw the real art, following your thumbnails. On paper, pencil lightly first, then go over the lines you keep with a pen and erase the rest. On a tablet, keep the sketch on its own layer. With AI, the script drives each panel, and a character sheet helps keep the same face and clothes from panel to panel. Whichever path you pick, draw no words inside the art yet.

    Professional teams often split this step between a penciller, an inker and a colourist. Working alone, plain black and white is a perfectly good finish.

    art-no-words.png
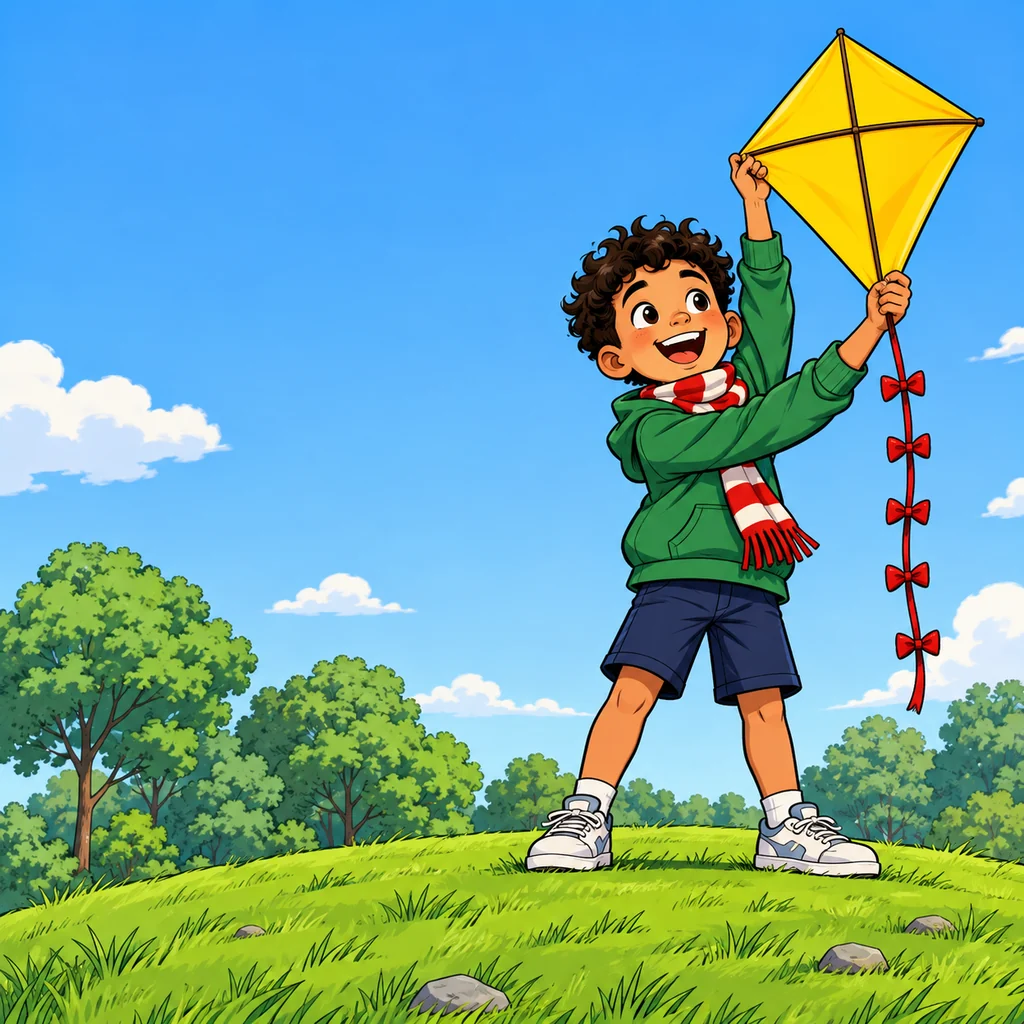
    Panel 1: Ollie, a boy in a green hoodie and red striped scarf, grins on a sunny grassy hilltop and holds up a yellow diamond kite with a red bow tail.
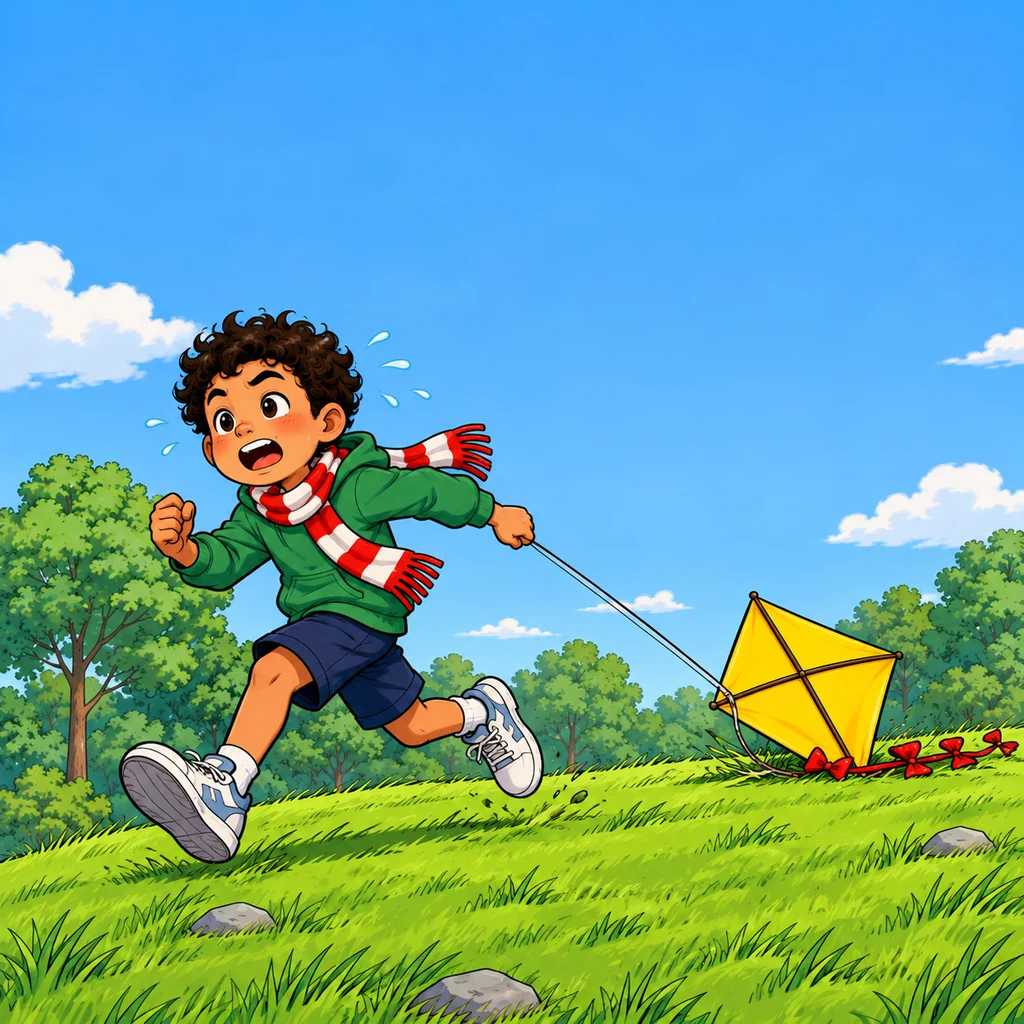
    Panel 2: Ollie runs down the hill as fast as he can, dragging the yellow kite behind him as it bumps along the grass.
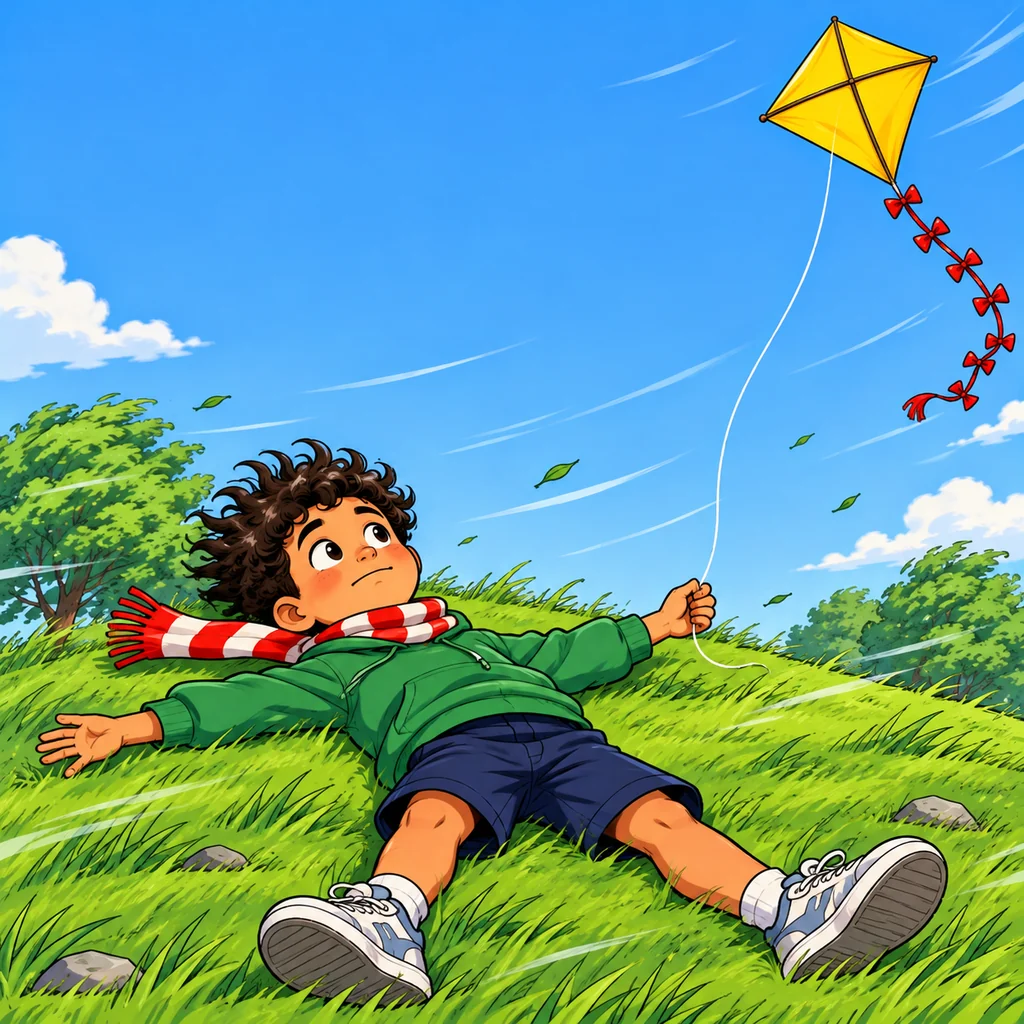
    Panel 3: Ollie lies flat on his back in the grass, worn out, as a sudden gust lifts the kite out of his hand and up into the sky.
    The three panels as drawn, with no words. The quiet corners are where the bubbles go next.
  6. 6

    Add the words

    Lettering is where a drawing becomes a comic. Place captions and speech bubbles so they read left to right and top to bottom, keep one font size for the whole comic, and never cover a face. Short lines read better: Ollie never says more than six words.

    By hand, keep your letters the same size in every bubble. On a computer, pick one of these comic lettering fonts and use it throughout.

    ollie-and-the-kite.png
    Panel 1: Ollie, a boy in a green hoodie and red striped scarf, grins on a sunny grassy hilltop and holds up a yellow diamond kite with a red bow tail.
    Perfect day for my new kite!
    Panel 2: Ollie runs down the hill as fast as he can, dragging the yellow kite behind him as it bumps along the grass.
    Come on, kite. FLY!
    Ten minutes later
    Panel 3: Ollie lies flat on his back in the grass, worn out, as a sudden gust lifts the kite out of his hand and up into the sky.
    Oh, NOW you show up.
    Same art, words added on top. The joke lives in the last panel.
  7. 7

    Share it

    Export one copy for screens and keep a big one for paper. For the web, a regular image is fine. For printing, the usual guidance is 300 DPI for colour and 600 DPI for black and white, so scan or export at that size from the start. When one page feels easy, you are ready to make your own comic book with more pages and a cover.

    export
    • Image for social posts
    • PDF to print at home
    • A printout for a friend
    • A webcomic post

Step 3 up close

How to write a comic script that is easy to draw

Here is the whole comic script for Ollie next to the finished panels. Tap or hover a panel in the script to see what it became. Each line of dialogue shows its word count against a common rule of thumb of about 25 words per bubble at most; this script stays far below it.

ollie-and-the-kite-script.txtabout 25 words per bubble

PAGE ONE (THREE PANELS)

Ollie grins on a sunny hilltop and holds up his yellow kite.
Perfect day for my new kite!
Ollie runs down the hill dragging the kite through the grass.
Come on, kite. FLY!
Ten minutes later
Ollie lies in the grass as a gust lifts the kite into the sky.
Oh, NOW you show up.
  1. 1

    Words first, bubbles second

    Write and place the text before you draw the bubble around it, and leave room for it in the art.

  2. 2

    One moment per panel

    If a description needs the word "then", it is probably two panels.

  3. 3

    Say where the camera is

    Wide, medium or close up. It tells the artist, even if that is you, how much to draw.

  4. 4

    Cut, then cut again

    Read the dialogue out loud. If a line sounds like a speech, split it or let the picture say it.

For parents and teachers

How to make a comic with kids: match the size to the age

The fastest way to lose a young comic maker is a page with too many boxes. These rungs follow the ranges used in kids drawing guides; treat them as starting points and move up when a child finishes easily.

  1. Ages 4 to 5

    1 or 2 panels

    One big picture, or a before and after. The child draws, an adult can write the words they say.

    Ask: what happened first, and then what?

  2. Ages 6 to 8

    3 or 4 panels

    A strip with a beginning, middle and end. Plan the three beats out loud before drawing.

    Big boxes leave room for big letters.

  3. Ages 9 and up

    A full page

    Four to six panels on one page, or a mini book folded from a single sheet of paper.

    Thumbnails start to pay off at this size.

  4. Teens and adults

    1 page, then a few

    Finish one page first. Beginner guides suggest a first longer comic of about four to eight pages.

    Longer than that is a book project.

Save yourself a redraw

Six mistakes that stop a first comic, and the fix for each

These come up again and again in beginner guides and in advice from working webcomic artists. Every one of them is easy to avoid if you know about it before you start.

  1. 01

    Starting with an epic

    A huge first story is the most common reason comics never get finished.

    Make a 3 panel strip or one page first. You learn every step, and you get to finish something.

    “it's better to start with something relatively short and easy”Sarah Driffill, makingcomics.com, 2013
  2. 02

    Too many panels on one page

    It takes ages to draw, and the art and words end up tiny.

    Stay between one and six panels per page while you learn. Fewer, bigger panels leave room for the words.

  3. 03

    Drawing first, adding words later

    The bubbles end up covering faces and hands, or squeezed into corners.

    Write the script and place the words in your thumbnails before you draw the final art.

  4. 04

    Long speeches in one bubble

    Big blocks of text stop the reader and hide the drawing.

    Keep each bubble to about 25 words at most; split long lines into two bubbles or two panels.

  5. 05

    Working at a small size

    You only find out when you try to print and it looks blurry.

    Scan or draw at print resolution from day one and keep that master file. Our guide to page sizes and print resolution has the numbers.

    “not scanning and keeping work at a print resolution, 300dpi or higher.”Evan Dahm, on the biggest webcomic mistakes, Gizmodo, 2014
  6. 06

    No ending in the last panel

    The strip just stops, and the reader is not sure it is over.

    Decide the last panel first: a joke, a surprise or a small win. Then plan the panels that lead to it.

    “Their first comic should not be about how they don't have a joke in the last panel.”David Willis, Gizmodo, 2014

Questions about making your first comic

Your first comic starts with one sentence.

Write it, sketch three boxes, and finish one small comic this week. Draw it yourself, or let AI draw it from your script.

Write your story sentence
VisaMastercardAmerican ExpressPayPal